Showing posts with label DIY. Show all posts

Thursday, May 18, 2017

A Thrifty Bathroom Makeover

We have a half bath on the main level of our house that was covered in wall paper when we moved in. Here is a before picture:


In March of 2015 we bartered wall paper removal with a friend of ours who runs a painting/wallpaper removal business. My husband does her taxes for her and she does some painting etc work for us.

Here it is after wall paper removal but before paint.


Next I painted the walls and trim.  Wall paint was approximately $35 ( paint color is Spinach White by Sherwin Williams) and trim paint we already had.
After I painted my Hubby turned the built in magazine rack into the toilet paper cubby. We spent about $5 on that. You can kinda see it in the first before picture at the top.  Here is the after:


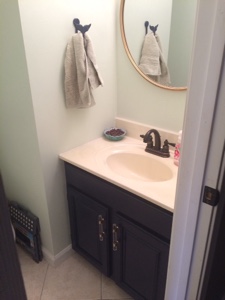
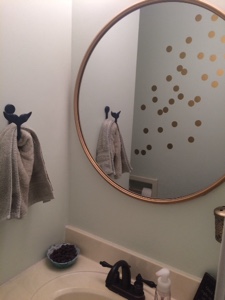
Next up we added a new light $78 at Lowes but I had a $50 gift card to use towards it.  We also added a new mirror which I bought off Overstock for $102.99 and then took apart and spray painted the frame gold using paint we already had.  I had a very hard time finding a round mirror for a reasonable price.  We also added a new facet
 light switch cover, outlet cover, door knob and door hinges all of which I bought on eBay, $80.11.  Next up I painted the vanity navy blue and added new handles and towel holder both of which I purchased at Hobby Lobby. I spent $28 on the paint for the vanity and $14.98 at Hobby Lobby.  Last thing I bought was some wall dot stickers for about $10.  I spray painted a frame I already had the same gold as the mirror frame and hung a poster in it that I already owned also. All decor I used in the bathroom I already owned. 

Here are a bunch of after pictures :)


Sunday, June 1, 2014

Ice Cream Cake

Here is a picture of the ice cream cake I made Kid # 5 for her birthday on Friday.


I have made several of these and have lost my orginal recipe so I am just gonna try to explain how I made it and then if anyone has questions feel free to ask them in the comments :)

First I went to Walmart and bought the 2 quart ( I think that is what they are) boxes of Great Value ice cream.  I bought one each of chocolate and vanilla.  I also bought one package of Great Value sandwich cookies.  The ones like Oreos.

Next I took a spring form pan, you know like you use for cheese cake, and used half the chocolate ice cream to put a layer on the bottom ( see picture above).  You have to let the ice cream soften so it can be spread but not to soft.  I did this on Thursday morning and then stuck the pan in the freezer 
with a plate sitting under it.

Thursday after noon I made this Chocolate Syrup .  While it was cooling I put my chocolate sandwich cookies through the food processer until crumbly then dumped them in a bowl and set aside until the chocolate syrup was cool.

When the chocolate syrup was room temperature I mixed about half of it into the sandwich cookies crumbs until the crumbs are well coated.  I then spread that on top of the chocolate ice cream and put it back in the freezer.

Friday morning I added half the box of vanilla ice cream on top of the cookie/syrup mixture and again put it back in the freezer.  Friday afternoon I drizzled a small amount of chocolate syrup over the top of the vanilla ice cream and spread it around a little, use your own judgement here.  Again back into the freezer until we were ready to do the birthday celebrating.

In the past I have left off the chocolate syrup on the top and have done Cool Whip instead.   I have also done frosting and chocolate and caramel sauce drizzle. I have also added caramel sauce to the middle layer after using the sandwich cookie crumbs.  Lots of options to do here.....

We have 3 days left of school and then we will be on summer vacation.  I hope to be back to regular posting very soon :)

Wednesday, December 5, 2012

Tomato Cage Tree

I have had a few requests to see the tomato cage tree I made.  Here it is


The only thing I bought for this project was the lights to go on the tree.  I had the pot it is sitting in, the tomato cage and the garland. It is pretty easy to make, wrap the cage in lights and garland, easy peasy!  My tree cost me around $14.  I just saw one similar to this at Walmart today for over $50.  Of course it looks very pretty at night too by my front step :) ( please ignore the fact that we really need to sweep the leaves around it AGAIN.  That corner collects them all year long!!)

Sunday, December 2, 2012

Fleece Boa Scarves

My friend, Judy, from When I get where I'm going, asked to see what my scarves I have been making look like.   So here are a few pictures of some of them.  They are fleece and about 60 inches long or so.  I have now sold 8 of them :)  This is the first time I have ever sold anything I have made.  It is a great feeling to know someone likes my items that much!


The maroon/gold one and the red/black one are local school colors around here.  Those seem to be the most popular.


Sunday, November 11, 2012

Kitchen Floor

For the last couple of months we have been working on our kitchen floor.  This really turned out to be more of a project then I thought was going to be.  One Friday while my husband was I work I went to town ripping out the first and second layer.  I of course thought" oh this will be easy".......ya not so much!

So here are some pictures of the whole process
         
     This is a pic of all the different layers


Here is a pic of the big mess I made when I pulled up the fist two layers


This was the "dining"half.  More peel n stick tiles.  We thought hard wood was under this.

 
This was the "kitchen" half. 


Eventually we did find hard wood under the "dining" half. But first was another layer of flooring


After 4 layers of flooring on the "dining" half and putting down floating vinyl on the kitchen half, we end up with this :)
 
 
This is the view from my living room into my kitchen.  I love the new floors. 


The hardwood is about 50 yrs old.  It is not perfect but it matches with the rest of the wood floors of the house and I love it!


We have new base board also.  We have been without for about two years now :)


So there ya go!  That was one less big project to get done :)  Oh I wanted to add all this whole project cost about $350.  Not to bad for new floors I think!
 

Tuesday, October 2, 2012

Another Cheap Light

I love the tripod lights I see on Pinterest and around the blogs.  There is no way I am gonna spend the money to buy a real tripod floor lamp from Pottery Barn though no matter how much I love it.  I couldn't seem to come across any cheap or inexpensive wooden tripods either so I decide to make do with what I had.

 I spray painted an old camera tripod that we had laying around with oil rubbed bronze spray paint.

 My wonderful hubby then wired it up with a light kit we already had.  I bought a lamp shade which cost was the most expensive part of the whole project.  Here is what we have now.......


I love it and we get several comments about it when people are over.

Thursday, September 13, 2012

Household Cleaners I Make Myself

1. All- Purpose Cleaner

2. Laundry Soap

3. Powdered Laundry Soap ( this is the recipe I am currently using)

4. Grapefruit Cleaner

5. "Dryer Sheets"


I am linking this post up here:
Frugal 
Tuesday Tip button

List of Things I No Longer Buy Premade

1. Frozen waffles

2. Pancake/waffle mix

3. Syrup

4. Most soups.  I do still buy Tomato soup though cause I just haven't found a homemade version I like better.

5. Bisquick Baking Mix

6. Taco Seasoning Mix

7. French Dressing

8. Ranch Dressing

9. Biscuits

10. BBQ Sauce

11. Granola

12.  Frozen Pizza

13. Pizza Sauce

14. Spaghetti Sauce

15. Rice packets ( like the Lipton Rice ones you buy at the store)

16. Cream Soups

17. Italian dressing

18. Sloppy Joe sauce

19. Coffee Cakes

20. Muffins - I never buy the box mixes for these anymore.  They are so easy to just make from scratch

Thursday, September 6, 2012

$5 Light From a Yard Sale

I've been on a roll with getting some much needed projects done lately.  This week I completed several.

A few months a go I found a much prettier over head light at a garage sale then what I had in my craft room originally.  The only thing I didn't like about it was that it was brass.  But I figured for $5 I could go ahead and get it and remedy the brass color.  I bought it right home and gave it a couple coats of brushed nickel spray paint.  Then it sat and sat waiting on my hubby to take down the old light so that I could paint the ceiling around where the new light would go in.  This week my awesome hubby did just that.  After the ceiling was dry he installed the new light for me.  Here it is    
 
I just love the pretty little bowl shaped shade it has over it.  It is also much much brighter then my old ceiling light!  Not to shabby for $5 at a yard sale huh?
 
One of these days I will post pics of my craftroom :)
 
I am linking this up to
 
 
Curb Alert
                                                    

Monday, March 26, 2012

Grapefruit Cleaner

I have been trying to make more and more of my own cleaners.  By doing this I not only save money but I also believe it is better for us.  I have seen several posts on other blogs and also some pins on Pinterest for homemade orange cleaner.  We don't eat oranges every often but after doing a little research I realized you can really use just about any citrus fruit and get the same results.  My husband does eat several  grapefruit a week so that is what I used for my cleaner.  I have been using this recipe for about a year now and I really like the results.  I keep a spray bottle in the bathroom and I recently made my own home made wipes with it also.


This is a picture of the start of my cleaner.  It is an old ice cream tub filled with the peelings of grapefruit and then covered with vinegar.  At first I didn't have enough of the grapefruit peels.  But my husband has a grapefruit most days at work for lunch, so he just brought them home to me.  I then added them to my vinegar and grapefruit mixture until it is full.  Now I will let this sit for about 3 to 4 weeks.  When the time is up I will strain out the grapefruit peels and leave the vinegar liquid solution.  When I need to refill my bathroom squirt bottle I will fill it with half the solution and half water.  I love it and it works great!


Monday, December 12, 2011

Somethings I have made lately

Here are a few presents I have made for Christmas.  I have several others I will post about after Christmas is over but these I know the person who is receiving them probably won't see :)


These are coasters I made for Kid # 5's teacher


I already had the all the materials to make these. 

Here are another set I made to use as a game gift that I needed for our Christmas Eve celebration


These are both just tiles I bought at Lowe's.  Mod Podge, scrapbook paper and a stamp.  They were really very easy to make!

Edited to add :  I stamped the paper, did one coat of mod podge, added the paper, then 4 coats of mod podge over the paper, drying in between coats.  I have read you then can spray with a clear sealer.  I have also read that if you let the mod podge cure for a few weeks before using then it is water proof.  I opted to do this since I made mine in plenty of time for Christmas.

Wednesday, November 16, 2011

Few Things I Have Made Recently

Some friends of our got married a few months ago and had their reception on 11/11/11.  My husband DJ'd their party which was mainly our gift to them but I still wanted to make them something. 

I saw this and this on Pinterest. I love Pinterest and have to admit I am addicted to that site lol!

Here is my version of the two ornaments


I had everything I needed to make it except the monogram "B".  I bought it at Hobby Lobby and used a 40% off coupon.  Total cost for the gift was less then a dollar!

Next I saw this sign on Pinterest.  I loved it!  Here is my version


I already had the frame and then I just typed it up in Microsoft Word, printed and framed it.  It sits on my desk and makes me smile every time I read it :)

Wednesday, August 3, 2011

Side Yard Project........

We have this space between our fence and our house that no one really uses but you can see from the front.  It doesn't get enough sun light there so nothing really grows there but the occasional weed.  What does happen though its it collects leaves and garbage.  It just looks bad!  I had found some good size stepping stones at a yard sale for $1 a piece.  I got 6 of them.  I really wish I would have got more but that is all that was left.  I decided I would use those on the project.  Here is a before pic:


Next I used some weed killer to get rid of any stray weeds that did grow along there.  Normally I am not a big chemical user in the yard but I didn't want to have to worry about weeds anymore in this spot.  Next I bought some edging and some weed fabric at Big Lots.  I ended up having to buy two rolls of both the edging and the fabric.  I ended up using very little of the second rolls of each so perhaps I will be able to make use of it in a future project.  My hubby picked up some yard staples and some tacks used to hold the fabric in place for me.  Anyway, I used the edging to line the fence with so that my mulch would not leak out for under it.  I laid and tacked down the weed fabric and then filled the space all in with mulch.  Once that was done I had my kids help me move the stepping stones into place.  Here is what it looks like now:


Total cost of the project was about $60! I consider that to be some what thrifty since yard projects always end up being so much money!  It was totally worth the money spent since it looks so much better!

Thursday, May 5, 2011

Thrifty Bookcase Project

Some time last summer my husband and I bought a little book shelf for a $1 at a yard sale.  It was made of white laminate and was in bad shape.  It had chunks missing out of it and looked as if someone had tried painting it.  It sat and sat in our garage all last summer and all through the winter.  Well if you happen to be a friend on my Facebook page then you know that I have a goal to complete 52 projects in 52 weeks.  I decided that this would be one of my projects. 

Here is a before pic.  I had already removed the shelf before I remembered to take a pic.        


My husband patched the missing chunks and gave it a sanding.  He then helped me out by taking it all apart.  I then covered each board with Mod Podge and some wrapping paper kid #3 picked out.  After all the boards were covered and dry I put the book case back together and my husband cut a scrap board for the backing.  Which I then painted white and he attached.  Here is the finished product :


I think it turned out pretty cute.  It now resides in kid # 2 & 3's room.  Total cost of the project was $1 for book shelf, and $3 for wrapping paper at Big Lots. The Mod Podge, wood filler, sand paper, scrape wood for backing and paint we already had left over from other projects.
      
I am linking up to                           

Tuesday, March 29, 2011

Tie Up Curtains on the Cheap

I have slowly been redecorating our bedroom.  One of the things on the list was curtains for the windows.  We have two windows in our room and of course I am decorating on a budget.  I found a white table cloth at The Mission Mart for about $5 that I thought may work to re-purpose into the curtains.  I also bought some Heat N Bond at Walmart because I am much to lazy to actually sew the curtains myself. 

The first thing I did was cut the table cloth in half.  Since the table cloth is hemmed already on all sides I planned to use the cut raw edge to fold over and make the curtain pocket.  Next I measured how wide I would need to make the pocket in order to fit on the curtain rod.  Then I got out my ironing board and iron and went to work.


Here I am ironing the Heat N Bond on to form the pocket.  It was super easy to use and worked really well!  I did this to both pieces to form the curtains.  Here is what they looked like when the pockets were complete and I put them on the rods.


Next I took some ribbon I already had and measured twice the size of the curtain.  I did not attach the ribbon, I just looped it over the curtain rod that way I could change it if I wanted.  I then tied the curtains up.

Here is what they turned out like!


I estimated I spent about $5 a curtain and they turned out really cute!  One of these days I will get the room finished and take some pictures of the whole room then :)